
One of the jobs I have at work is to “manage” the makerspace, a room with a 3d printer and laser cutter and a few other cool toys in it. This room is supposed to be a facility for students and staff to build small prototype objects for any projects they have, however work-related or wacky – it’s been used to print cases for kit, build replacement lab components, try out ideas for robots, and print any number of D&D figurines and small plastic dinosaurs. When the pandemic started, it was closed to humans and the printer got commandeered into a PPE printing effort (bravo).
For the last year or so the printer has been back but the room is too small for social distancing so it has been closed to students. During this time, if anyone wanted one-off small prints I’ve been printing stuff. Now, however, we’re about to open it up again so I thought I’d blog about a little manufacturing project I’ve been helping out with: a local clockmaker (Tom Parry) has been fixing the town clock.
Tom knew which part had failed, and wanted to get hold of a model part to try in the place. So he drew a sketch, and sent it over.
Building a model
If you want to build a model part you first need a software model – this could be a 3d model drawn in something like Blender, or something more programmatic. I only use Blender once every couple of years and can easily forget everything I know during that time period, so I asked on our student chat (Discord) server if anyone wanted to help me make a model. Alex Baldwin stepped up and built it in OpenSCAD. I like OpenSCAD and have now used it for another project – it’s easy to understand and learn for a programmer, and it doesn’t have thousands of baffling menus like Blender. In my view, it’s 3d modelling for true computer nerds. Yay!
Here’s the render from Alex’s OpenSCAD – I’ll put the actual code at the end so interested parties can see what it looks like.

I emailed a screenshot of the scad model to Tom the Clock and he said it looked great! First time, well done Alex. So I printed it, choosing an attractive green colour filament.
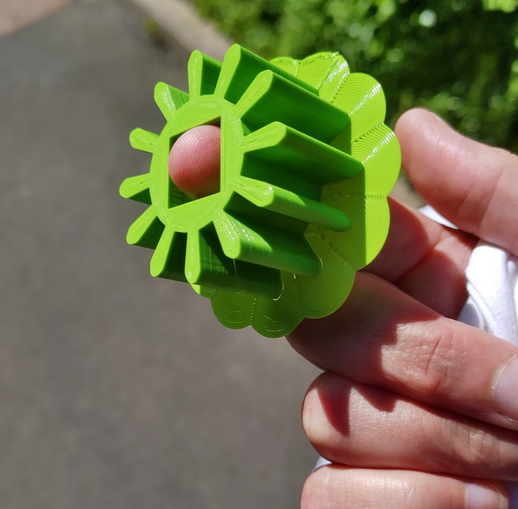
I thought we’d have to do a few iterations on this – indeed my email to Tom the Clock sharing a photo of the print called it “First draft”. However, Tom took the plastic cog, and tested it in the actual town clock.

This was enough for Tom to work out how the old piece had been damaged, and then to effect a repair. Apparently the clock’s been running OK for the last week and the repair seems to have held. University Makerspace to the Rescue!

And this is the end of my blog post, so as promised, here’s Alex’s code for the piece:
$fn = 32;
height = 25;
outer_radius = 49.75 / 2;
outer_circumference = 2 * PI * outer_radius;
mid_radius = 44 / 2;
mid_circumference = 2 * PI * mid_radius;
inner_radius = 28.5 / 2;
inner_circumference = 2 * PI * inner_radius;
inner_square = 16;
teeth = 12;
teeth_ratio = 12 / (18 + 12);
calc_teeth_width_tip = 3;
calc_teeth_width_mid = 4.5;
calc_teeth_width_base = (inner_circumference / teeth) * teeth_ratio;
difference() {
    union() {
        cylinder(height, inner_radius, inner_radius);
        for (i = [0:teeth]){
            hull() {
                rotate(i * (360/teeth), [0, 0, 1])
                translate([0, outer_radius - (calc_teeth_width_tip / 2), 0])
                cylinder(height, calc_teeth_width_tip / 2, calc_teeth_width_tip / 2);
                rotate(i * (360/teeth), [0, 0, 1])
                translate([0, mid_radius, 0])
                cylinder(height, calc_teeth_width_mid / 2, calc_teeth_width_mid / 2);
                rotate(i * (360/teeth), [0, 0, 1])
                translate([0, inner_radius, 0])
                cylinder(height, calc_teeth_width_base / 2, calc_teeth_width_base / 2);
            }
        }
    }
    translate([inner_square * (-0.5), inner_square * (-0.5), -1])cube([inner_square, inner_square, height + 2]);
}